How to Measure A Garden
Site Surveying: How to Measure A Garden and Plot it on Paper
Before you can start designing a garden, you need to know how to measure a garden, then plot it on paper. In order to do this, you will need to carry out a site survey.
Your area measurement should be as accurate as possible, as mistakes here could land you in trouble. For this reason, I suggest you only carry out your own surveys on relatively small, simple plots up to a ¼ acre in size (1000m²). Anything larger than this, or involving complicated levels, needs to be carried out by a qualified land surveyor.
Invest in a good measuring tape. One that goes out to 50-60m (100ft) is usually good enough for most gardens. You can buy one for under £30/$30 in most DIY stores or builder’s merchants.
If possible, get yourself a willing assistant. If you can’t get anyone to help you, then a metal spike, skewer or tent peg that you can hook the end of your tape over, will do just as well.
When you arrive on site, the first thing to do is walk around the garden to familiarise yourself with the plot.
“BE AWARE: GARDENS ARE RARLY SQUARE OR HAVE TRUE RIGHT ANGLES. WHAT LOOKS LIKE A STRIAGHT LINE, MAY VERY WELL BE ANGLED OR EVEN CURVED. SO NEVER TRUST YOUR EYE ALWAYS MEASURE CAREFULLY.”
Next, take your paper and draw two separate plans. One large one of the house. Include the position of windows, doors, drain pipes, plus any inspection chambers (manhole/drain covers) close to the building. Only include the part of the house which is relevant to the garden plan – front or rear. You don’t have to include it, unless there are side gardens too.
On a separate sheet of paper, draw out a plan of the whole site. Getting the approximate shape as accurate as possible. Include the house, garage, outbuildings and existing trees. You will need to record each trees approximate height, the girth of the trunk and canopy spread. Remember to include trees that overhang form neighbouring gardens. Also include patios drives, ponds, pools etc. but not necessarily flower borders unless you intend to keep them.
Regardless of the shape of your garden, you always start with the house. Your house should sit square onto the plan. Accurate measurements of the house are essential, because you will use it as a ‘fixed point’ to measure everything else.
How to Measure A Garden: Measurement Types
Surveying is not complicated. In general, we only use 3 types of measurement when surveying a garden
1. A Direct Line Measurement: The simplest of all the measurements used, it measures a point from A to B
2. A Running Dimension: Similar to the direct line measurement except to measure a number of points along the same line. This is particularly useful when measuring the house, as you can start at one corner and run the tap along the wall and record the positions of doors and windows along the same line.
3. Triangulation: When you know the length of three sides of a triangle there is only one shape that triangle can be. Triangulation is used to fix the corners of the garden and the position of trees etc. Using one wall of the house as one of your triangle sides, you take another 2 measurements from each end of the wall to the same corner which then gives you your three side of a triangle. These measurements are then used to accurately plot the position of the corner relative to the house. (Further explanation of this will be given in lecture GD506 Plotting and Scale but for now just take my word for it that this works!)
Start at one corner of the house and work your way around all or its sides until you arrive back at where you started. Use running dimensions and direct line measurements and assume all walls are 90º unless obviously not. Record all the measurement clearly on your sketch of the house and make sure all numbers are clearly legible so there is no confusion when you get back to the office.
How to Measure A Garden: Scale
A scale of 1:50 or ¼”=1’-0” is okay for small courtyard or town gardens 1:100 or ”=1’-0” is okay for most medium sized gardens and 1:200 or 1”=10’ is best the larger sites. At a scale of 1:100 this means that for every 1 metre you have measured, you would represent that on your drawing as 1 centimetre. For example, 200cm on your plot would equal 2cm on your drawing. Likewise 450cm on your plot would equal 4.5cm on your drawing. Simply divide your initial measurement by 100. If you have a small plot, you can use a scale of 1:50.
How to Measure A Garden: Triangulation
Even if you think a garden is completely square you should always check the corners using triangulation and never take for granted what your eyes are telling you.
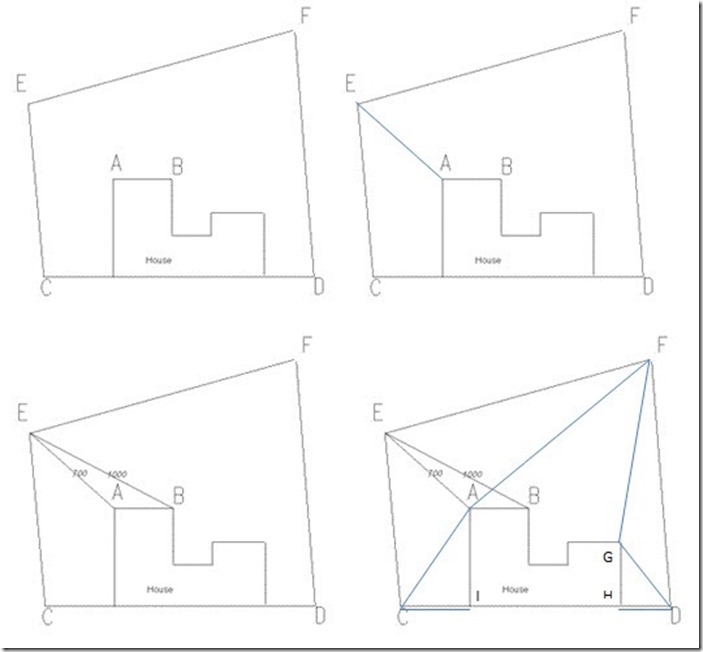
Triangulation involves taking two measurements from fixed corners of the house – to the point that you wish to plot. In this case, we will use points A and B as shown in figure 1 for our fixed points.
Now, we need to find points E and F and, to do this, we need to triangulate. Take a measurement from point A to point E and another from point B to point E. (Figure 3)
In order to plot all four corners, we need to know the following measurements A-E B-E, A-F G-F, G-D H-D, A-C I-C
“THE BIGGER THE TRIANGLE THE MORE ACCURATE THE MEASURMENT”
Therefore triangulation AF-GF will be more accurate than AE-BE because the triangle is bigger. (It doesn’t matter that A & G are not a straight line)
Remember: That you need 2 measurements from the house for every corner you plot. I always draw out the triangulation line on my rough sketch of the site, to make sure I have all the measurements I need before I leave.
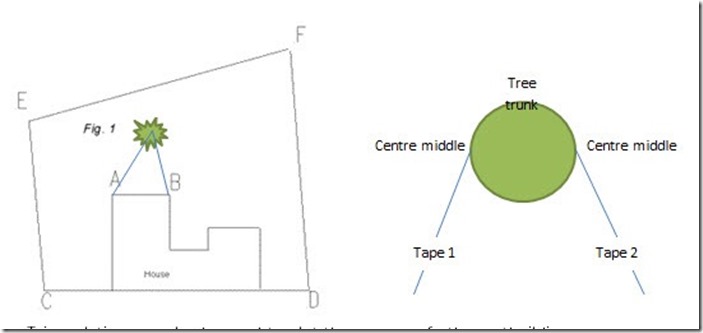
You can also use triangulation to plot the position of trees and other elements in the garden. See Diag. below. When measuring a tree you run each tape to the ‘centre middle’ rather than to the front of the trunk (see diag. below) as this gives a more accurate reading.
Triangulation can also be used to plot the corners of other outbuildings garages and even the centre of drain covers so it’s probably the measurement you use most, when surveying a garden.
How to Measure A Garden: Offsets
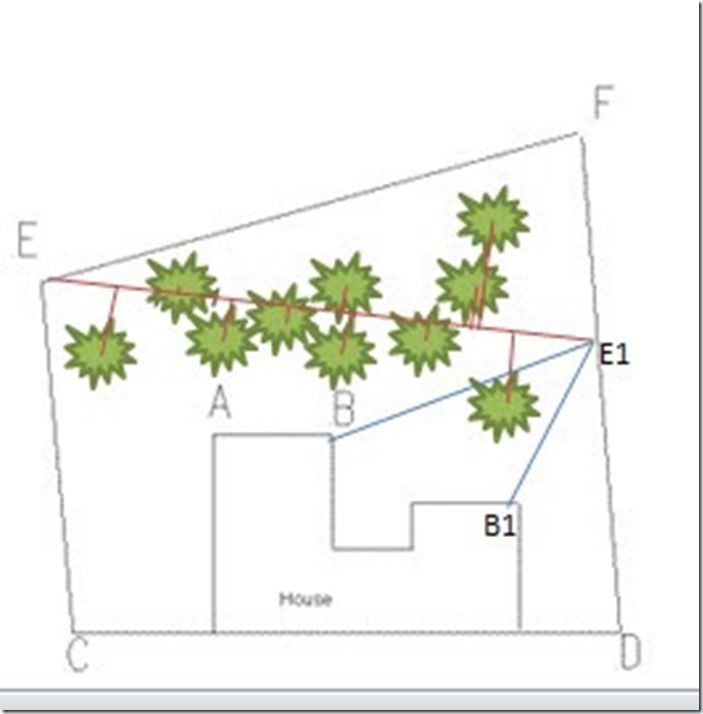
There is one more measurement that is useful for the garden designer and that is called offsets. Imagine for a moment our garden, instead of just one tree had a small wood.
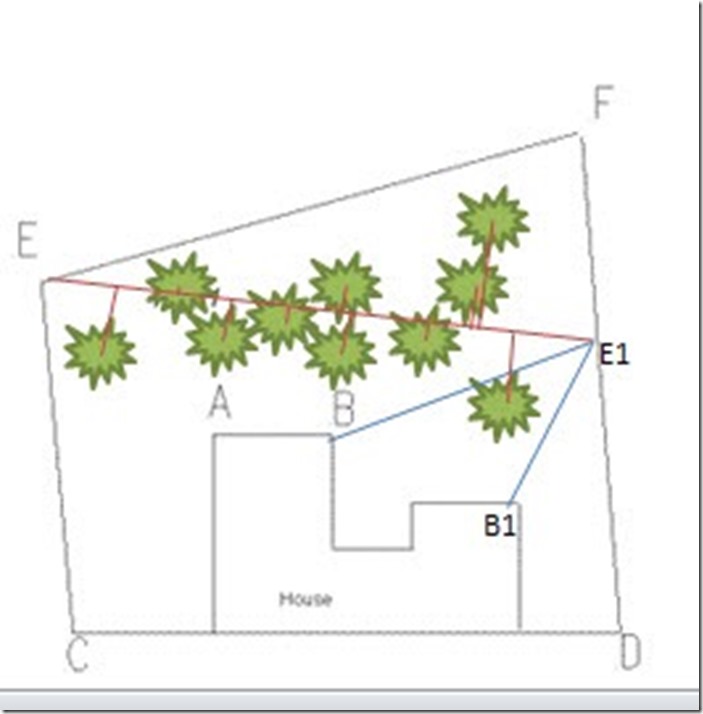
You need two tape measures for this. Lay one along the ground between two known points i.e. E – E1. If you don’t have two easily identifiable points, you can make them up, then triangulate their positions e.g. point E1
Then with a second tape, run a measurement back from each tree to the tape on the ground making sure you meet the tape at 90°. Then record the measurement from the tree, as well as the point at which the two tapes meet (see red lines). In this way, you can quickly measure many trees using a whole range of offsets.
This method is also useful for measuring curved flow beds. Set up your tape close to your flower bed along the ground and plot the position of each end using triangulation. Then take a measurement at 90°along the tape every 2-5m back to the flower bed and record the distance. When you get back to the office, you can mark off the points on your plan then join up the dots like a dot-to-dot picture to get the shape of your curve.
The same approach can be used for measuring curved walls/boundaries.
How to Measure A Garden: Gathering Additional Site Information
The garden designer should photograph the site extensively as a reference for what already exists. Don’t just take landscape shots, but also reference photos of features such as: steps, drains, oil/gas tanks, septic tanks, boggy areas, banks, overhead cables. Shots from upstairs windows, showing an aerial view of the garden and its neighbours are useful. In short, you can’t take too many photos. These may also one day be useful as ‘before and after’ pictures, if the garden is published in a magazine, so don’t throw them away!
Other sources of information are also important and should be considered. In some countries, the client is legally responsible for supplying services information such as the route of electricity, water and drainage. If this is the case you need to inform them in writing so they are aware of their responsibilities.
You may still need to obtain this information on their behalf and you would do this by contacting the service providers directly, who should have a record of where pipes and wires enter and leave a property.
Other information can be obtained from:-
1. Old architectural house plans: These can contain a survey of the house to include the position of doors and windows. Scale plan of the site. The position of outbuildings etc.
NB. Never take existing survey information as gospel, as it will need verifying with your own survey.
2. Local Deeds: May contain information on boundary ownership,(which neighbour owns which fence) Public rights of way etc.
3. County Engineer: (Same as above)
4. Local Council: Different countries have different planning laws. Please research your local planning restrictions. TPOS (Tree preservation orders, contact the tree forestry officer) Planning enquiries Local planning officer, planning permission for outbuildings/conservatories etc. Queries on land use Enquiries on any special local planning legislation Further information on planning will be covered in GD1207
CHECKLIST FOR SITE SURVEYS
In addition to the previous 4 categories; the other site information you need can be divided into 3 categories
Physical Aspects (natural)
1) Geology underlying rock
2) Soil pH(acid/alkaline)
Texture (sand/loam/clay)
other (chalky/stony/peat)
3) Topography physical location of site
4) Drainage surface water
(flowing/standing)dry/damp areas
5) Climate wind movements prevailing wind turbulence
air movements (frost pockets)
shelter/exposure
sun/shade (daytime/seasonal variations)
atmospheric pollution
6) Vegetation trees/shrubs (size, density, age condition indicator species)
7) Fauna evidence of any wildlife
Cultural Aspects (man-made)
1) House style, age, materials, unique features
2) Structures type, size, material, condition
3) Access vehicular/pedestrian (general circulation)
4) Services electricity/gas/water(position, line, size)
5) Legal land ownership, rights of way, fire access tree preservation orders
Sensory Aspects (perceptual)
1) Character uniqueness of site (house/surroundings)
2) Views without (type, extent, position significance)
within (sequence of views and spaces)
visual barriers (limits to view)
the visual effect of the site from surroundings
3) Privacy overlooked/enclosed (boundary
effectiveness
4) Other noise, smell, tactile qualities
IMPORTANT: I have already mentioned at the start of this lecture that a site survey could be considered a legal document and if incorrect, could cause great upset and may even land you court. One of the ways to minimise the risk of incorrect measurements is to make sure the following wording appears on all your drawings:
All dimensions must be checked on site and not scaled from this drawing
The designer must always be careful not to misinterpret what may appear to be an obvious boundary line. The actual location of the property/boundary line is essential. If there is any doubt, always get the client to sign off the survey to say they believe it to be true and accurate or get a qualified land surveyor to carry out the survey for you.
Garden area measurement is not hard to do, and in 99% of the time, it’s very straightforward. So don’t be scared about taking this on. Just be aware that on the odd occasion, where perhaps a fence is missing, you may be better off employing a professional.

